3D wheel balancing
In this section: 57 articles
- 3D wheel balancing
- A driving instructor for experienced drivers
- A woman's car
- Choose genuine Peugeot parts from AvtoGlobus!
- What's an online store for?
- Body parts for the Nissan X-Trail T31 in your city
- Reliable reverse cameras and factory-fit head units
- Number plate theft
- Statoil car oils, lubricants and petrol
- Original Parts for Foreign Cars
- Parts for foreign cars: where to buy?
- Types of screw compressors
- How to bleed air from a BMW clutch actuator
- Replacing a damaged BMW driveshaft boot
- Car-wash chemicals: effective products
- Original Japanese Auto Parts: An Alternative to an Engine Swap
- Kia car seat covers
- Dry cleaning your car's interior
- Types of tuning
- Bike-mounting accessories
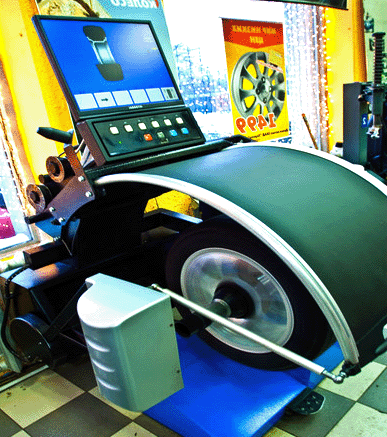 A recent addition to the range of services on offer to drivers is 3D wheel balancing, which has quickly caught the attention of potential customers. Every car owner has run into a wheel-balancing problem at least once in their life. Road conditions in Russia leave a lot to be desired, which is why changing wheels twice a year is a necessary part of running a car. Drivers who genuinely value their car should make visiting a tyre shop part of their routine. According to specialists, the 3D wheel balancing process ensures a safe and stable ride on the road.
How is the 3D wheel balancing procedure carried out?
First, using a machine, for example from the Hofmann brand, a laser scan of the wheel disc alone is performed, which is what the 3D technology consists of, and then the assembled wheel is processed the same way. The disc is placed on the machine, and a computer model of the disc is built up using three lasers. Based on the resulting model, the radial and axial runout of the disc is determined so the initial stage of balancing can be carried out. If the disc's runout (imbalance) exceeds the allowed limits, it's sent straight to the area where alloy wheel repair is carried out, to assess whether the disc's geometry can be restored.
Once the scan is finished, and provided the disc is fine, it's taken off the machine and sent to another one for mounting the tyre. For low-profile tyres and Runflat-type tyres, a so-called "third hand" is used in addition — a manipulator that compresses the tyre's stiff sidewall area. On the inside of the machine there's a compressed-air tank, used for a "blast inflation" that's needed when the tyre beads won't seat on the rim humps.
Once the wheel assembly is fully put together, it's sent to the balancing stand, where a laser scans the geometric parameters of the disc and wheel. During this process, the computer determines how to position the tyre and disc together so as to compensate for the disc's and tyre's runout as effectively as possible. Once the computer has finished the analysis, the technician marks a point on the tyre's surface relative to a reference point and returns the wheel to the machine for mounting. While working, the technician sees on the monitor not just the numeric runout readings, but also the maximum and minimum points highlighted on the runout graph. Thanks to this equipment, it becomes possible to position the marks relative to the tyre and disc as precisely as possible.
After all of the above, the tyre is deflated, and the technician tries to line up the points previously marked on the surfaces of the disc and the tyre. The tyre is then reinflated and sent on to the final balancing stage. To make it easier to work with the tyre, it's recommended to coat the area of contact with the disc's surface with a special mounting paste. You shouldn't head straight out on the road right after fitting the finished wheel to the car. Let the wheel dry out properly. For the rebuilt wheels to serve the driver well for a long time, a calm driving style should be maintained for a full day after mounting.
Once the wheel assembly is complete, it goes through the final balancing stage. Given how extensive the balancing programme is, several methods of attaching the weights can be preferred. The technician can mount them not just on the front face, but also behind the disc's spokes, which looks considerably better from an aesthetic standpoint.
An additional feature of 3D balancing is "optimising wheel placement on the car." Here it's important to take into account which axles suit wheels with a directional tread pattern, and which sides suit wheels with a non-directional, asymmetric pattern. This procedure is needed so the remaining wheel runout is compensated for. By following each step of the wheel balancing programme, the smoothest possible ride is achieved, and no excess load is placed on the suspension components. It's also worth remembering that the wheel's parameters (bolt circle, wheel offset, centre bore diameter, and so on) must exactly match the vehicle manufacturer's requirements (and specifically for that particular model), otherwise driving safety cannot be guaranteed.